More Yoga Poses for Athletes (Pros and Amateurs Alike!)
- Published: Tuesday, August 20th 2013
- in Fitness
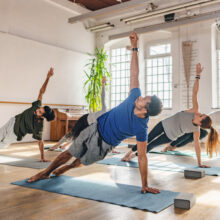
Last week we brought you four yoga poses athletes of any sport and skill level should try, courtesy of yoga expert and instructor Katie Brauer—and we were so inspired, we thought we’d say Namaste to trying six more! In round two of yoga for athletes, Kimberly Fowler, creator of YAS Fitness Centers, the yoga/spinning hybrid, and the Yoga for Athletes® class, shares additional insight on both benefits and poses.

“Personally, I don’t think there is anything better then yoga to help keep athletes ‘injury free,’” Fowler says. “If you get injured from overuse, for example running, you end up not being able to do what you love. You’re sidelined until you recover.”
In addition to injury prevention, advantages of yoga include increased flexibility and body awareness, Fowler tells us. “I always use yoga to gauge how my own body and the bodies of the athletes I train are holding up under the stress of preparing for competition.”
Increased strength is another benefit. “I know when you think of an athlete, you don’t think they need to work on strength but they do,” she continues. “For example, runners have strong legs but little upper body strength, so yoga helps balance out your bodies, and in the end makes you a better athlete. Yoga is also the best for ‘core strength’—in sports, everything starts with the core because it’s your center of power, whether you are running, jumping, or swimming.”
Meanwhile, Fowler conveniently broke down these six yoga poses with hints and tips. In her own words, she says:
1. Forward Bend Pose
Why: Stretches and lengthens the muscles of the whole back of your legs, hamstrings, calf muscles, and lower back.
Hint: Try to keep your feet from rolling in or out, keep them in a neutral position, to help with tight IT bands.
How: Sit on the ground and bring your legs together feet touching; sit up tall and take a deep breath as you reach up and on your exhale, hinge forward from your hips and try to reach for your toes. If you can’t reach your toes use a towel, strap, or even a T-shirt. Hinge from your hips and keep your back flat. Hold for 60 seconds.
2. Seated Tree Pose
Why: Releases tightness in your outer hip and lower back.
Hint: If your knee is up in the air, then bring the foot of your bent leg down, closer to your knee or calf.
How: Sit up straight like you did in Forward Bend and bring your right foot to the inside of your left thigh. Take a deep breath in and on your exhalation, hinge forward and try to grab your foot. If you can’t reach your foot, use your towel. As the area around your outer hip stretches, your knee will start to ffall to the floor. Make sure the back of the straight leg is on the mat; you are still working on lengthening and stretching the hamstring muscles on the outstretched straight leg. Repeat on other side.
A key component of yoga is body awareness, so notice if there is a difference between one side and the other.
3. Cobbler Pose
Why: Stretches your lower back, hips, and inner thighs.
Hint: Let your head go. Allow it to hang forward, using the weight of your head to help you sink deeper into the pose.
How: Bring the soles of your feet together with knees wide apart. Sit up tall; take a deep breath in, and on your exhale, hinge forward. Try to bring your “nose towards your toes” (don’t worry if your nose can’t touch your toes at this point). If this is an easy pose for you, then walk your hands out in front of you. If your knees are way up in the air, move your feet a little further from your body or use your elbows to push your knees down, gently! This is a great pose for runners and cyclists.
4. Reclining Pigeon Pose
Why: All athletes have issues with tight hips. This is a safe and effective way to create more flexibility in your hips without putting pressure on your knees. If you only have the time to do one of these poses, this is the one to do!
Hint: If you cannot reach your shin, just grab the back of your thigh. Keep your neck relaxed. Use a folded towel under your head if your head is lifted off the mat or your neck is tight.
How: From Cobblers pose, bring your knees together then roll down so you are lying on your back on your mat. Hug your knees into your chest and then bring your right foot on top of your left thigh. Bring your right arm through on the inside of your leg and the left arm on the outside. Lace your hands around your left shin and bring your knee towards your chest. Repeat on other sides. Try to hold this pose for at least one minute on each side. Make sure you take a moment and notice if there was a difference between your right and left hip. If you do have one side that is a lot tighter than the other, I would suggest holding this pose longer on the tight side, to help balance out your body.
5. Easy Spinal Twist Pose
Why: Stretches your lower back, hips, and neck.
Hint: Keep your shoulders on the ground.
How: After Reclining Pigeon, hug your knees into your chest and rock side to side. Take a deep breath in, and on your exhale, hug your knees into your chest and rock side to side. Release everything to the mat for Corpse pose.
6. Corpse Pose (Optional)
Why: To let the benefits of your yoga poses settle into your body before you “run off.”
Hint: This can be the hardest pose of all because you have to “just relax.” If you want, you can use this time to visualize: You can use techniques that help connect you with performance, such as crossing the finish line with your best time ever.
How: Lie flat on your back, arms out by your sides with palms up. Take one deep breath in through your nose and let it out through your mouth. On your next exhale, let every muscle go, just relax into your mat. Stay here a minute or two if you can. From here roll onto your side, and use your hands to come up to an easy cross-legged position. Take a moment to see how you feel; I’m sure your body will thank you!
Plus, read Part I of Yoga for Athletes!

Kate Phillips